Category: Recipes

Bantha Cakes were first found in the cabinets of the Afternoon Delight by Xianna in episode 7 (well… listeners will hear about them first during the Jedi Adventures part 2, but we first created them in ep7). They described as processed snack cakes and the squadron immediately thought of Zebra Cakes… but blue. So not surprisingly, the classic Little Debbie snacks were a heavy inspiration for these cakes. A yellow cake, a whipped cream filling, a poured frosting, and a drizzle on top.  We decided upon almond-white chocolate as the flavor and tinted the frosting and filling to that wonderful shade of Bantha milk blue.

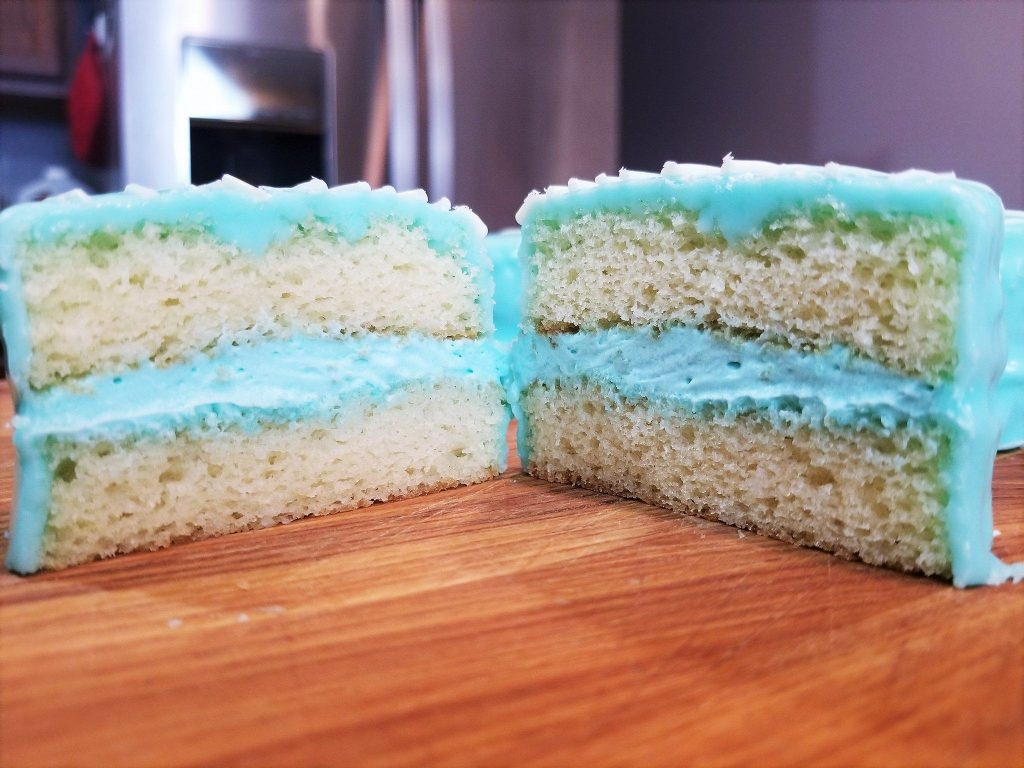
Bantha Cake cross section


First, let’s start with the cake. The recipe we use is a fairly standard yellow cake recipe that uses buttermilk to keep the cake extra moist. Once the cake is baked and cooled, you’ll a 3-inch round cutter to cut out 16 to 20 round pieces. How many pieces you’ll get will depend on if your cutter is exactly 3 inches or not.

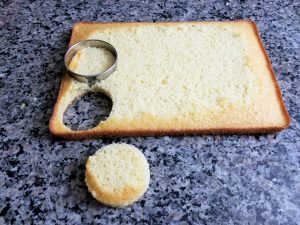
Cake pieces being cut out


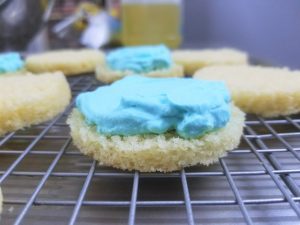
Next comes the whipped cream filling. The special ingredient in the filling is dry milk powder. It adds extra body to the whipped cream and makes it more stable. This helps prevent the whipped cream from melting at room temperature.

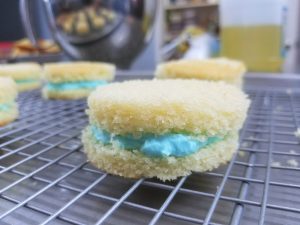
You’ll divide the filling evenly between half of the cake pieces. Then place the remaining cake pieces on top to create a “sandwich”. You may not use all of the filling. Don’t worry. Any extra can be eaten with the extra cake pieces. We’re not saying that we smushed handfuls of cake and filling into our mouths like a bunch of toddlers, but… wait- nevermind. We are saying we did that.

Cake pieces and frosting assembly process


Once the cakes are made and sitting in the fridge, you’ll start the fondant coating. It’s made in a double-boiler, which is a metal bowl placed atop a saucepan with an inch or two of boiling water. This means the steam is what’s heating up the fondant instead of the stove directly. It’s a more gentle way to heat things up, and helps prevent anything from burning or cooking unevenly.

The initial mix is powdered sugar, corn syrup, more blue food coloring, flavoring, and a bit of water. Once it’s fully heated through and mixed you’ll turn off the stove and add the white chocolate chips. Stir until everything is combined, and then it’s time to pour!

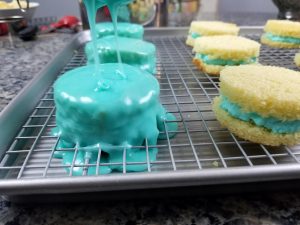
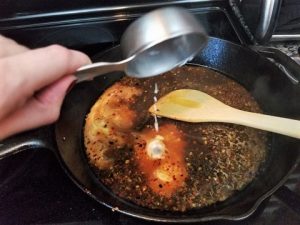
Using a ladle or large spoon you’ll pour the fondant over the chilled cakes. Any gaps or bumps can be smoothed out with a butter knife or the back of a spoon. Do this immediately after pouring, before the fondant has time to set.

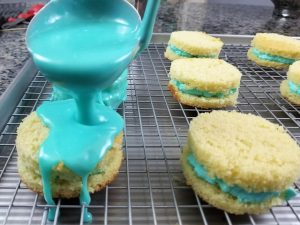
Fondant being poured over the cakes


The final step is the white chocolate drizzle. You’ll melt white chocolate in the microwave in small increments (to prevent burning), and then using a spoon drizzle it on top of the cakes.

And there you have it, Bantha Cakes!

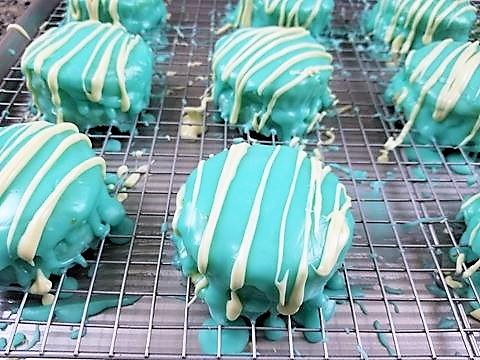
Bantha Cakes with white chocolate drizzle


Tabletop One’s Tips:

  • Buttermilk can be substituted by adding 1 tablespoon lemon juice to a measuring cup, and then pouring whole milk to reach the 1 cup mark. Let sit for 10 minutes.
  • If your cake top puffs up and is rounded after baking use a bread/cake knife to even the top out.
  • If your double broiler or bowl is not large enough to hold 12 cups of powdered sugar, make the fondant in two batches.
  • Make sure the bowl you use to melt the chocolate is completely dry. Any amount of moisture can make the chocolate seize and become clumpy.


Bantha Cakes [makes 8-10 large cakes]

1 recipe Vanilla Cakes (recipe to follow)
1 recipe Whipped Cream Frosting  (recipe to follow)
1 recipe Poured White Chocolate Fondant  (recipe to follow)
1/2 cup white chocolate chips

Using a 3-inch round cookie or biscuit cutter and cut out rounds from the cakes. You should get between 16 and 20, depending on how close to 3 inches your cutter is.

Place large dollops of the whipped cream frosting on 10 of the cake rounds. Smooth out the frosting. Place the remaining ten rounds on top.

Place the cakes on a rack over a baking tray. Put in the refrigerator while you make the fondant.

While the fondant is still warm, begin to pour the fondant over the cake rounds. If the fondant becomes stiff and less pourable, place it back on the heat for a few minutes. Continue until the cake rounds have been fully covered. The fondant recipe makes quite a bit, and there will probably be excess. If needed, you can scoop up the fondant that has collected on the tray and stir it back into the fondant in the double-boiler.

Place the chocolate chips in a microwave safe bowl. Microwave for 30 seconds. Stir. Microwave for 15 second intervals, stirring in between, until the white chocolate is fully melted. Drizzle over the cakes.

Let the cakes sit for at least an half an hour to allow the frosting to set.


Vanilla Cakes [makes 2 9″x13″ cakes]

2 1/2 cups all-purpose flour (312 grams)
2 1/2 teaspoons baking powder
1 teaspoon baking soda
1 teaspoon salt
4 large eggs
1 1/2 cup sugar (300 grams)
2 teaspoons almond extract
1 teaspoon vanilla extract
1 cup canola oil
1 cup full-fat buttermilk

Preheat the oven to 350°F and line two 9″x13″ pans with parchment paper.

In a medium bowl, whisk together cake flour, baking powder, baking soda and salt. Set aside.

In the bowl of an electric mixer, beat eggs with the whisk attachment on medium speed for 15-20 seconds. Add sugar and continue to beat on medium speed for 30 seconds. Add vanilla and oil and beat on medium speed for 1 minute. Reduce mixer speed to medium/low and slowly add about half of the flour mixture. Add half of the buttermilk, then the rest of the flour mix and the rest of the milk. Beat until just combined and smooth, scraping down the sides of the mixing bowl. The batter should be thin.

Pour batter evenly between the two pans. Bake for about 15 minutes, or until a toothpick inserted into the center comes out clean. If cooking the cakes on different racks in the oven, switch them halfway through to promote more even cooking. 


Whipped Cream Frosting

1 cup heavy whipping cream
1/2 cup powdered sugar
1/2 teaspoon almond extract
1/2 teaspoon vanilla extract
1 tablespoon nonfat powdered milk or nonfat instant dry milk
Blue food coloring

In a mixing bowl combine the cream, powdered sugar, milk powder, extracts, and powdered milk.
Whip until the cream begins to thicken. Add the food coloring until a bright, light blue shade is achieved. I used 6 drops of Blue and 2 drops of Teal, both Wilton gel food colors. Continue to whip until the frosting is thick and holds its shape.

Poured White Chocolate Fondant

6 cups powdered sugar (720 grams)
1/2 cup water
2 tablespoons light corn syrup
1 teaspoon vanilla extract
1/2 teaspoon almond extract
Blue food coloring
3/4 cup white chocolate chips

Bring a pot of water to boil, then placing a larger metal bowl or double-boiler over it.

In the bowl, whisk together the powdered sugar, water, corn syrup and extracts. Add the food coloring until a bright, light blue shade is achieved. I used 4 drops of Blue and 1 drop of Teal, both Wilton gel food colors.

Continue whisking until the mixture becomes smooth. It should be thin enough to drizzle from a spoon. If using a food thermometer, the temperature should reach 95°F.

Turn off the heat, add in the white chocolate chips and stir until fully melted.


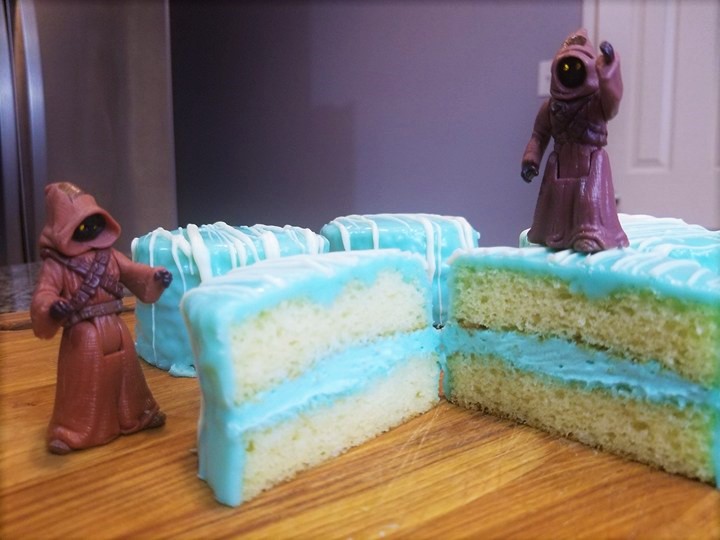
Bantha Cakes with Jawas. Because we had them out at the time and didn’t have bantha figures.


Ah yes, the bug-monkey meatballs again. Or is it monkey-bug? For a creature we made up ourselves we sure don’t know anything about it. This week we’re bringing you another version of these little cocktail appetizers. This time they’re made out of mushrooms and lentils. And before you even say “but I don’t like mushrooms” know that once they’re minced, fried, and mixed in you can’t tell they’re there. We promise! A few of our squad mates down right hate mushrooms, but love these.

Faux Bug-Monkey Meatballs


These little meat-less balls are similar to our original Bug-Monkey Meatballs, with a few differences. The biggest is a base of lentils and mushrooms instead of pork and fish. Since the lentils and mushrooms are on the softer side there’s also less soy sauce with more cornstarch and breadcrumbs to help them bind together. Because the mixture is a bit softer they are also baked instead of pan fried. The sauce is almost the same with the exception of the removal of the fish sauce and extra soy sauce to compensate for it.


Ingredients. Piled artistically. Because we could.


The lentils are first cooked in vegetable stock and liquid smoke to give them some extra flavor. Once they’re soft and all the liquid has been absorbed three-fourths get pureed in a food processor. Pureeing some of the lentils creates a base that is easy to form and binds well, while keeping some of the lentils whole gives the “meat”balls more texture so they don’t end up mushy.


Then mushrooms are cooked in a mixture of vegetable oil and coconut oil. The coconut oil will firm up while the mixture rests in the fridge and make these easier to roll into balls, but will melt when cooked and help keep things “juicy”. Once all the moisture from the mushrooms has cooked out and they become crispy we add the garlic and ginger for a minute to release their flavor.


“Meat”ball mixture


Everything is then mixed together and put in the fridge for an hour. This rest time lets the coconut oil solidify. Towards the end of the rest time preheat the oven. We tried pan frying these, like the original Bug-Monkey Meatballs, and it did not work well. The softer mix didn’t hold up and they fell apart. If you are set on pan frying these and are fine with them not being vegan you can add an egg to help create a tighter bind.


“Meat”balls on the baking tray.

Use about a tablespoon of filling and roll into little balls. Make sure you line your baking sheet with either parchment paper or a silicone mat. Don’t use tin foil. These little suckers will stick to the foil.  Bake for 30 minutes, flipping them around every 10 minutes.


While they bake, make the sauce. It’s almost exactly the same as the sauce from the original recipe, except you’ll use the pan the mushrooms were cooked in and extra soy sauce instead of fish sauce.


Once the sauce is done and the balls are baked combine them, place in a bowl (We understand if your bowl isn’t square and fuzzy. We ourselves could only get a square bowl), garnish with green onions, and serve!


Faux-Bug-Monkey Meatballs with toothpicks!


Faux Bug-Monkey Meatballs

1 cup green or brown lentils
2 cups vegetable stock
1/4 teaspoon liquid smoke (optional)
3 tablespoons vegetable oil; divided use
3 tablespoons coconut oil; divided use
8 ounces cremini mushrooms; minced
4 cloves finely minced garlic
1 tablespoon minced or grated ginger
4 tablespoons Chinese garlic chives, finely chopped (or a mix of the green part of scallions and regular chives)
1/2 teaspoon ground Sichuan peppercorns
1 teaspoon salt
1 tablespoon sugar
2 teaspoons sesame oil
2 tablespoons soy sauce
3 tablespoons cornstarch
1/2 cup breadcrumbs

Prepare lentils by rinsing them and adding to a pot with the vegetable stock and liquid smoke. Bring to a boil, then reduce the heat down and simmer covered until all the liquid is absorbed and lentils are tender (about 15-20 minutes).

Heat 2 tablespoons vegetable oil and 2 tablespoons coconut oil over medium heat in a medium sauté pan. Add the mushrooms and cook, stirring frequently, until the mushrooms have lost all moisture and have become crispy. Add the garlic and ginger and cook until fragrant, about 1 minute. Remove from the heat.

Add 3/4 of the lentils to a food processor and pulse until a thick paste forms. Pour into a large bowl, along with the reserved lentils, the cooked mushroom mix, chives, peppercorns, salt, sugar, sesame oil, soy sauce, cornstarch, breadcrumbs, and the remaining vegetable oil and coconut oil. Stir thoroughly to combine.

Cover with plastic wrap, and place in the refrigerator for an hour.

Preheat the oven to 400 degrees F.

Form into small meatballs, about 1 tablespoon each. Place the meatballs on a parchment or sil-pat lined baking sheet. Bake for 30 minutes, rotating the balls every 10 minutes.


For the sauce:

1 clove minced garlic
1/4-1/2 teaspoon red pepper flakes
1/4-1 teaspoon ground Sichuan peppercorns
3/4 cup vegetable stock or water
3 tablespoons Shaoxing wine
2 tablespoons soy sauce
2 tablespoons Chinkiang vinegar
1 tablespoon sugar
Cornstarch slurry (2 teaspoons cornstarch dissolved into 1 tablespoon water)

To the skillet the mushrooms were cooked in, add the garlic, red peppers flakes, and Sichuan peppercorns. Stir for about 30 seconds, until the garlic is fragrant.

Add the vegetable stock, Shaoxing wine, soy sauce, vinegar, and sugar. Stir to combine, making sure to scrape up any browned bits on the bottom of the skillet left from the meatballs. Bring to a simmer.

Add the cornstarch slurry and continue to simmer for about 2 minutes, whisking constantly, until the sauce has thickened. Add the meatballs to the sauce, and stir to coat them.

Garnish with sliced green onions and serve with toothpicks.


The opening scene of our recent Jedi Adventures arc features the Jedi eating noodles at a street vendor on Coruscant. For these noodles we wanted a fast and easy recipe, since these would have needed to be dished out quickly as people ordered them. The sauce requires no cooking and can be made while the water for the noodles are boiling.

Noodles, with extra sambal oelek for serving


These noodles are seriously delicious and so easy. They’re great for weeknight dinners when you want something fast with as little effort as possible. They are also quite tasty cold, making them wonderful to pack for lunch.


Noodles!


The sauce is rich, creamy, and just a little spicy. It starts with sesame paste (sometimes called tahini) and peanut butter. Together these create the rich, luscious base of the sauce. Soy sauce and rice vinegar are added for flavor, sugar for a touch of sweetness, and sambal oelek for just a bit of heat. Then hot vegetable broth is added to thin out the sauce.


Tabletop One’s Tips:

  • Almost any type of round, Asian noodles work for this dish.
    • At normal grocery stores, look for fresh noodles in the Asian section. They will often have vacuum-sealed packets of noodles.
    • If buying dried noodles, look for “white noodles”; noodles made with white flour instead of semolina. Italian pasta is made with semolina wheat flour, which gives it its distinctive yellow color, but imparts a flavor that is not ideal for this dish.
  • Tahini can be found either with the other nut butters, or the “international” aisle, specifically the Greek or Mediterranean section.
  • Sambal oelek is a Southeast Asian chili paste and can usually be found where ever your store sells sriracha (probably the most famous maker of sriracha, Huy Fong, also makes a sambal oelek. It also has a rooster on the jar.)
  • This recipe is easily scaled up to make more than one serving.


Coruscant Street Noodles [serves 1]

6 ounces fresh wheat noodles (or 3 ounces of dried noodles)
1 tablespoon sesame paste/tahini
2 tablespoons peanut butter
1 tablespoon soy sauce
2 teaspoons rice vinegar
1 teaspoon sambal oelek chili paste, or more to taste
1/2 teaspoon sugar
1/4 cup hot vegetable broth
1 tablespoon chopped green onions

Cook the noodles according to the instructions on the package.

While the noodles are cooking, make the sauce by combining the remaining ingredients, except the green onions. Stir until it forms a smooth, even sauce.

When the noodles are cooked, drain them and toss with the sauce, and place into a bowl.

Top with the chopped green onions and serve immediately.


Today we bring you the Naboo Sky. It appears in episode 6 during a meeting with Falx. This cocktail is a beautiful shade of blue and packs quite a punch. Based on the classic Water Lily cocktail, the Naboo Sky is a combination of triple sec, lemon juice, gin, and violet liqueur. The brand of violet liqueur used gives it the wonderful blue color, as well as a delightful floral note.

We used a locally distilled gin with heavy citrus and fruity notes that we felt paired well with the violet liqueur. You can use whatever gin you’d like. If you aren’t sure where to start, we recommend a London dry gin.

The Naboo Sky


Naboo Sky [serves 6]

5 ounces triple sec
5 ounces fresh lemon juice
5 ounces gin 
5 ounces The Bitter Truth Violet Liqueur, or any other blue violet liqueur 

For best results: Combine and pour in a decanter. Chill for at least one hour. Serve in martini or coupe glasses.

For authenticity: Combine and pour into a decanter. Keep the decanter on your desk for some amount of time. Serve in whatever glasses are available.


The Naboo Sky


Bug-monkeys, also known as monkey-bugs or “those gross things.” Served to the crew in episode 3, they were described as “little diced-up bits of meat with toothpicks” and were in a square, fuzzy bowl.

This one took a while to figure out. Were they chunks of whole meat? Were the diced-up bits formed together to make bigger pieces? What does a bug-monkey even taste like?

After some discussion we decided they were small meatballs that had a slight fish taste. We spent some time figuring out exactly what that meant. At one point we even threw out the idea of frog legs! But eventually a pork-fish blend was settled on. We picked flounder for its light flavor, thinking it would blend well with the pork.  The rest of the dish was based on a favorite cocktail meatball recipe of ours.

The final product!

We didn’t have any square, fuzzy bowls, but we did have this adorable Chewbacca bowl!


First, let’s start with the aromatics and seasoning. Garlic, ginger, and Chinese chives build the foundation of this recipe. Chinese chives have a wonderful garlic taste to them that works great in this dish.

Garlic, ginger, and chives

Next comes the Sichuan peppercorns. This spice has a unique “mouth numbing” property that’s hard to describe until you’ve tried it. We like ours with a fairly course ground, but you can grind yours as finely as you like. We used a mortar and pestle, but feel free to use a spice grinder.

Sichuan peppercorns

Ground Sichuan peppercorns

After that we add salt, sugar, sesame oil, and soy sauce for added flavor, and cornstarch and breadcrumbs to help bind the meatballs together.

The meatball mixture before mixing (not shown: breadcrumbs)


Once the mixture is well combined, we roll them into balls using about 1 tablespoon of the mix. They are then placed on lined baking sheets and placed in the fridge for an hour to firm up. The recipe says to use parchment paper, but silicone baking liners like the one in our photo will work as well.

Meatballs on a lined baking tray


When the meatballs are ready to be cooked, heat up some oil in a heavy skillet over medium-high heat. Cook the meatballs on all sides until they are deep brown. Don’t worry if your skillet or pan doesn’t hold all the meatballs at once. Work in batches and keep the cooked meatballs on a plate while you cook the remaining ones.

Our first batch of meatballs


Once the meatballs are cooked we’ll begin making the sauce. In the same pan you cooked the meatballs you’ll add minced garlic, Sichuan peppercorns, and red pepper flakes. Cook for 30 seconds until fragrant, stirring the whole time to make sure the garlic doesn’t  burn.

Garlic, peppercorns, and red pepper flakes


Then we’ll add the fish sauce, stock, Shaoxing wine, soy sauce, vinegar, and sugar. Stir well, making sure to scrape up any browned bits left in the pan from the meatballs.

Waiting for the sauce to simmer


Once the sauce begins to simmer, add the cornstarch slurry and stir until thickened.

Adding the cornstarch, then whisking


Once the sauce has thickened add the meatballs back in and stir to coat.

Meatballs being coated in sauce


Pour into your square, fuzzy bowl (or whatever you have lying around), garnish with some sliced green onions, and serve!

The final product


Tabletop One’s Tips:

  • Make sure the flounder is ground well. Using a food processor is highly recommended.
  • Not sure your guest’s will like the fish? Don’t worry, it can be substituted with ground chicken, turkey, beef, or even more pork.
  • We highly recommend heading to your local Asian grocer to get Sichuan peppercorns and Chinkiang vinegar (or buying from an online source). They really make this dish. If you can’t get them the Sichuan peppercorns can be substituted with ground black pepper. The Chinkiang vinegar can be substituted for 2 parts rice wine vinegar, 1 part balsamic (1 tablespoon Chinkiang vinegar= 2 teaspoons rice wine vinegar, 1 teaspoon balsamic).
  • Shaoxing wine can be replaced by a dry sherry or a dry Chinese rice wine. It can also be replaced by more broth if you do not want to use alcohol.


Bug-Monkey or Monkey-Bug Meatballs (makes about 40 meatballs)

16 ounces ground pork
12 ounces ground flounder flesh (may substitute sole, haddock, or cod)
4 cloves finely minced garlic
1 tablespoon minced or grated ginger
4 tablespoons Chinese garlic chives, finely chopped (or a mix of the green part of scallions and regular chives)
1/2 teaspoon ground Sichuan peppercorns
1 teaspoon salt
1 tablespoon sugar
2 teaspoons sesame oil
3 tablespoons soy sauce
2 tablespoons cornstarch
1/4 cup breadcrumbs
2 tablespoons vegetable oil

Add all ingredients except vegetable oil to a large mixing bowl. Stir until completely combined.

Form into small meatballs, about 1 tablespoon each. Place the meatballs on a parchment-lined baking sheet, cover with plastic wrap, and place in the refrigerator for an hour.

Heat the oil in a cast iron or stainless steel skillet over medium-high heat. Pan-fry the meatballs until browned on all sides and cooked through. Remove from the pan and set aside on paper towels to drain.


For the sauce:

1 clove minced garlic
1/4-1/2 teaspoon red pepper flakes
1/4-1 teaspoon ground Sichuan peppercorns
2 teaspoons fish sauce
3/4 cup low-sodium chicken stock or water
3 tablespoons Shaoxing wine
1 tablespoon soy sauce
2 tablespoons Chinkiang vinegar
1 tablespoon sugar
Cornstarch slurry (2 teaspoons cornstarch dissolved into 1 tablespoon water)

To the skillet add the garlic, red peppers flakes, and Sichuan peppercorns. Stir for about 30 seconds, until the garlic is fragrant.

Add the fish sauce, stock, Shaoxing wine, soy sauce, vinegar, and sugar. Stir to combine, making sure to scrape up any browned bits on the bottom of the skillet left from the meatballs. Bring to a simmer.

Add the cornstarch slurry and continue to simmer for about 2 minutes, whisking constantly, until the sauce has thickened. Add the meatballs to the sauce, and stir to coat them.


Garnish with sliced green onions and serve with toothpicks.

The finished meatballs, complete with toothpicks.


The Scarif Sunrise. Drunk by Xianna in Episode 3. Fun, fruity, and the bane of our existence. In the episode Laura described this drink as green on the bottom, orange in the middle, and red on top. Most of this drink was pretty easy to figure out. Orange juice and tequila would make up the orange, and melon liqueur would become the green. 

The problem? Most red liquids sink to the bottom in cocktails. Grenadine and fruit syrups are heavy with sugars and won’t float atop lighter juices and alcohol. We tried a handful of different fruit juices, but they were still too heavy and sank. It wasn’t until we thought to mix a bit of alcohol into the juice that we saw any improvement. We finally found true success by mixing 100% cranberry juice with a small amount of tequila.

So after much trial and error, we present to you, The Scarif Sunrise!


Scarif Sunset [serves 1]

1/2 ounces melon liqueur, such as Midori
3 ounces fresh orange juice
2 ounces tequila
1/4 ounce 100% cranberry juice

Pour the melon liqueur into a goblet or wine glass. Combine the orange juice and 1-1/4 ounces of the tequila in a shaker with ice and shake well. Carefully pour this mix over the melon liqueur. Combine the remaining 3/4 ounce of tequila and the cranberry juice in a small glass. Carefully pour this mixture on top of the drink.


We highly recommend squeezing your own orange juice for this drink. It takes more time and adds a few extra items to be cleaned, but we feel that it’s worth it. With so few ingredients the quality of the orange juice really shines through. We found the cara cara variety to be our favorite, but any variety will do.


The Falling Star first appeared in Prologue 1 when Felton Mox orders one for Karma. It’s clear, very strong, and served with a cherry. Our version of the drink features pisco (a type of brandy made in Peru and Chile) with dry vermouth and bitters for depth, a bit of simple syrup to cut the bitterness, and, of course, a cherry. This drink is strong and definitely made for sipping.

Trivia Time: the name “Falling Star” also shows up in Prologue 2, but it’s given the same description as the Sparkling Star. We’re not saying our wonderful game master and Tabletop Leader made a mistake, but… wait… yes we are.


While they’re much more expensive than grocery store ‘maraschino’ cherries, we highly recommend grabbing a jar of Luxardo brand maraschinos. The difference between the two is night and day. The Luxardo cherries are slightly sour, not as cloyingly sweet, and taste like real cherries.


Falling Star [serves 1]  
2 ounces Pisco
1 ounce dry vermouth
1/2 ounce simple syrup
Dash of orange bitters
Garnish: Luxardo maraschino cherry

Shake well over ice. Serve in a rocks glass. Garnish. 


The Sparkling Star first appears in Prologue 1 when Karma orders it. The drink was described as complicated and using a number of shakers, and we accepted that challenge. After some searching we stumbled upon the magical butterfly pea flower. When brewed in water like a tea it is a rich blue color, but when it becomes exposed to acidic liquid it turns a brilliant magenta. We decided on a lemon based drink to get the acidity and even threw edible glitter in there for some extra “oomph”.

This drink is tart, refreshing, and guaranteed to impress your friends. 


The Sparkling Star is served out of two containers. One container will have the pale yellow lemon mix.  The second container will have the butterfly pea flower mixture. This container should be clear to show off the beautiful blue color of the butterfly pea flower liquid.

We found this neat “vinegar and oil” container to use for serving. It definitely isn’t necessary, but it does look cool.


Sparkling Star [serves 1]  

1/4 ounce butterfly pea flower concentrate (recipe below)
1-1/2 ounces vodka
1/2 teaspoon blue luster powder or other edible glitter
1/2 ounce St. Germain
3/4 ounce simple syrup
2 ounces fresh lemon juice

In a clear shaker or shot glass combine the butterfly pea flower concentrate, vodka, and the luster powder. Stir well and set aside. In another shaker add the St. Germaine, simple syrup, lemon juice, and ice and shake well. Pour the vodka lemon drink into a martini glass. Carefully pour in the butterfly pea mix.


Butterfly Pea Flower Concentrate

2 cups water
1/2 cup dried butterfly pea flowers (about 1/4 ounce)

Boil water. Combine the water and flowers in a heat-proof container and let steep for 10 minutes. Strain through a fine mesh sieve, discarding the solids.


Mocktail Version

This cocktail is easily converted into a non-alcoholic drink. Replace the vodka with water, and the St. Germain with lime juice. We used the mocktail version in the cool, bubble-container pour video.


Simple syrups are a quick and easy way to add sweetness to cocktails. Regular, granulated sugar doesn’t dissolve well in cold liquid, and more often than not you’ll end up with a grainy drink. By creating a pre-dissolved sugar syrup you can add sugar to your cocktail without worry. 

The following are basic syrups that will appear in multiple of our recipes. They are easy to halve or double.

Keep these syrups in airtight containers and in the refrigerator. They will last at least a month.

You can see our current collection of syrups. From left to right: Ginger Mint, Honey, Demerara, Cinnamon, Vanilla, Simple, Raspberry.


Simple Syrup

1 cup water
2 cups sugar

Add water to a saucepan over high heat and bring to a boil. Add the sugar and stir until fully dissolved, about 1 minute. Remove from the heat and let cool completely.


Cinnamon Simple Syrup

1 cup water
2 cups sugar
2 cinnamon sticks

Add water to a saucepan over high heat and bring to a boil. Add the sugar and cinnamon sticks, and stir until fully dissolved, about 1 minute. Remove from the heat. Let sit for 12 hours. Strain before using.


Vanilla Simple Syrup

1 cup water
2 cups sugar
1 vanilla bean pod

Add water to a saucepan over high heat and bring to a boil. Add the sugar and stir until fully dissolved, about 1 minute. Remove from the heat. Split the vanilla bean pod lengthwise and scrape out the seeds. Add the seeds and the pod to the syrup. Let sit for 12 hours. Strain before using.


Before we get started we want to cover a few of the basics of equipment: shakers, measuring, glasses, and a few others. 


Seen here: Cobbler shaker, 2 different jiggers, bar spoon


Shakers

There are a few different ways to shake up your cocktails. The two most common types of shakers are the Cobbler and the Boston Shaker.

Cobblers consist of a base tin, a straining top, and a small cap. They are easy to find and easy to use. However, the built in strainers usually have small holes that can making straining slow, especially if the drink has chunks (such as the mint in a mojito). We have cobbler shakers for their ease of use.

A Boston shaker is has only two pieces, a base tin and a glass. The glass is wedged into the tin to create a cap before shaking. These are also easy to find, and they are easier to clean than the cobbler. The cons? They can take some getting use to; making sure the two pieces are properly wedged together before shaking takes some practice. Straining anything smaller than small ice cubes will require a strainer. For the less agile out there, the glass part of the shaker is easy to break, being glass. However, it’s becoming increasingly easy to find Boston shakers where both pieces are made of metal.


Measuring

The most common measuring device for cocktails is the jigger. It consists of two metal cones attached at the points. The two sides are usually of different measurements, most often a 1 ounce and a 2 ounce. They are easy to use and easy to clean, but it can create clutter to buy multiple ones to get all the measurements you might need. This is why we recommend getting a jigger with measurement lines on the inside. OXO makes a great one with 1/4 ounce, 1/3 ounce, 1/2 ounce, 3/4 ounce, 1 ounce, and 1 1/2 ounce lines.

Regular, Imperial measuring cups and spoons can also be used. Most Americans already have them in their house, and they are quite cheap. However, they can be difficult to use for cocktails. The small amounts usually found in cocktails can be hard to measure in measuring cups, and using spoons requires calculating how many ounces they hold.

If you are using Imperial measuring cups/spoons use the following:

1 cup = 8 ounces
2 tablespoons = 1 ounce
1 tablespoon = 1/2 ounce
1 1/2 teaspoons = 1/4 ounce

Another option is the kitchen scale. While not common in America, they are easily found in places that use the metric system (so… everywhere else). If your scale does not have an Imperial option, you can easily find ounce-to-gram or ounce-to-ml conversion charts on the internet. We recommend measuring ingredients in separate containers before adding to your shaker. It’s very easy to over pour, especially with small measurements. If you accidentally add too much of an ingredient to the shaker with everything else already in it, there’s not much you can do. But if you pour too much into a small container with nothing else it’s easy to pour some of that ingredient back into its original container.


Bar Spoons

Bar spoons while not necessary, are quite useful. They have long, thin handles that make them perfect for stirring a large range of containers. You’ll notice that many bar spoons have twisted handles. This helps them glide past ice cubes.


Glasses

Seen Here: rocks glass, martini glass, champagne flute, champagne coupe

Rocks Glasses: These glasses usually hold 6 and 8 ounces of liquid, but you will usually only see them filled half way. A rocks glass is typically used for strong drinks with either a few ice cubes, an ice sphere, or no ice at all.

Common drinks: Old Fashioneds, Sazeracs, Negronis

Martini Glasses: Most martini glasses hold between 4 and 6 ounces of liquid. The stem of the glass allows you to hold the glass without heating up the drink. This is useful since the martini glass is commonly used for cold drinks that are not being served with ice.

Common drinks: Martinis, Sidecars, Manhattans

Champagne Flute: Typically 8 ounces. Much like the martini glass, the tall stem of the champagne flute prevents your hands from warming up your drink. The thin, tapered shape of the glass helps prevent too many bubbles from being created and escaping too soon.

Common Drinks: Champagne, French 75

Champagne Coupe: The coupe glass usually holds 4 to 6 ounces. Despite its name, the Champagne coupe is a sub-par glass for champagne. The wide, open shape means too many nucleation sites and therefore too many bubbles that are then lost. Much like the martini glass, they are most often used for cold drinks that are not served over ice.

Common Drinks: Clover Clubs, Pisco Sour


Martini Vs. Coupe: You might have noticed that the martini glass and the coupe glass are nearly identical. So how do you know which drinks go in each one? Short answer: you don’t. Outside of a few drinks they’re pretty interchangeable, and it comes down to personal preference. We prefer to serve drinks with froth in the coupe glass, and clear drinks in the martini glass. We just think the coupe glass lets you see the layers in a frothy drink better.


Seen Here: copper mug, highball, wine glass, shot glasses

Copper Mug: Around 16 ounces, these mugs are not solid copper. They are nickel or stainless steal with a copper coating on the outside only. The copper mug is the traditional serving vessel of the Moscow mule. Why? I don’t know. But it’s tradition! There really is no other reason than tradition and aesthetics for serving a Moscow mule in a copper mug. If you don’t have them, or don’t wish to buy them, you can use a highball.

Common Drinks: Moscow Mules

Highball: These straight up-and-down glasses are between 12 and 16 ounces. They are most commonly used for drinks served over ice, often with carbonated components.

Common Drinks: Gin Fizz, Gin and Tonic

Wine Glass: Anywhere from 10 to 25 ounces these glasses are used for, you guessed it, wine. There is a huge variation in size in wine glasses, which specific types for different varieties. Like other stemmed glasses we’ve covered, the stem prevents the wine from warming up too quickly.

Common Drinks: Wine, Wine Spritzers

Shot Glasses: Shot glasses are 1 to 3 ounces and almost exclusively used for taking shots.

Common Drinks: Shots


Others

Blenders are great for frozen, blended drinks and making fruit purees. We recommend getting the highest quality blender you can; cheap blenders will often leave large chunks of ice that stick around no matter how long you run the blender for.

Cocktail picks make small garnishes like olives and cherries easy to take out of the drink.

Tiki accouterments: tiki glasses, paper umbrellas, and colorful straws can add  fun flair to tropical drinks, but are not necessary. Tiki drinks can be poured into regular highball glasses.


Scroll to top